Homemade Vanilla Ice Cream

img_3696

After finding my family’s old ice cream maker in my dad’s basement a few weeks back, I decided it was time to test it out again after over 25 years.  The ice cream maker still worked great, and I was so happy to be able to find an excuse to make homemade ice cream in the middle of winter 🙂

Homemade Vanilla Ice Cream

3 cups organic half and half

1 cup organic heavy whipping cream

1 cup organic sugar

8 organic egg yolks

2 teaspoons organic vanilla extract

Place the half & half and whipping cream in a large saucepan over medium heat, stirring frequently.  Mix the sugar into the egg yolks.  Once the half & half and whipping cream have reached a simmer, temper the eggs with the mixture.  Continue to stir the custard mixture over medium heat for 5-8 minutes.  Remove from heat and allow to sit for 30 minutes.  Add the vanilla extract and refrigerate until cool.  Pour into an ice cream maker and follow the manufacture’s instructions.  Enjoy!

Variations:

Chocolate Ice Cream:  Add 1 1/2 cups organic cocoa powder to the cream mixture and then simmer.

Pistachio Ice Cream:  Replace the organic vanilla extract with organic almond extract.  Then add 1 1/2 cups chopped pistachios once the mixture is cooled.

img_4554

Herbal Energy Balls

img_3662

A few years ago, while attending the Mother Earth News Fair, I was lucky enough to attend a seminar led by herbal guru Rosemary Gladstar (I chronicaled our trip here.)  She was such a wonderful speaker:  so brilliant in her knowledge of adaptogenic herbs, but also incredibly entertaining and funny.  My favorite part of her presentation was when she was speaking of the incredible health benefits of ashwagandha root and hawthorne berry.  She said, “If you love your spouse and want to share many, many years with him/her, be sure you both consume ashwagandha and hawthorne berry daily.  If you don’t, save it all for yourself.” (!)

Ms. Gladstar discussed many different ways of consuming adaptogentic herbs, but I was particularly drawn to her idea of “energy balls.”  I played around for some time with what combination, and which ratios of those ingredients, work best for our family.  Below is the recipe we have used in my family for about a year and a half now.

These herbal energy balls are great to have as a daily snack, or if you need to grab a quick bite on your way out the door in the morning.  I hope you enjoy!

Herbal Energy Balls

32 oz. organic peanut butter

32 oz. local honey

2 cups organic unsweetened coconut

2 cups organic chocolate chips (We like to use mini chocolate chips.)

1/3 cup plus 1 tablespoon gotu kola powder

1/3 cup plus 1 tablespoon rhodiola root powder

1/3 cup plus 1 tablespoon ashwagandha root powder

1/3 cup plus 1 tablespoon hawthorne berry powder

Mix the peanut butter and honey in a large bowl.  Then add the herbs and mix to the best of your ability.  (The mixture will grow very hard to stir.  Don’t worry, this will be resolved when you add the warm coconut.)  Then toast the coconut in the oven until it is golden brown.  Add the warm coconut to the peanut butter/honey/herb mixture.  Mix thoroughly.  Add the chocolate chips and stir until combined.  Roll into one inch diameter balls and store in the refrigerator until consumption.  These will last in the refrigerator for several weeks.  Enjoy!

*Note:  I order all my herbs through Mountain Rose Herbs.

Pumpkin Zucchini Bread

Last fall I did some reading about how to grow pumpkins.  I was astonished to find that many people said to simply discard of your old pumpkins in an area in which you want to grow pumpkins again.  Those pumpkins will decompose, the seeds will deposit into the soil, and then regrow the following year.  So, last fall, as our decorative pumpkins began to go soft, I simply placed them in a side bed in our yard.  Then as I processed some pie pumpkins, I scrapped out the seeds and placed those in this bed as well.  In the very early spring (early March), I covered the entire bed with a very thin layer of compost.

And voila…

IMG_3109…we now have pumpkins taking over our yard.

Some of the pumpkins are ready for picking this week, so I played around in the kitchen a bit and came up with this recipe.  I hope you enjoy it!

IMG_3103

Pumpkin Zucchini Bread (makes one loaf)

Mix the following ingredients in a large mixing bowl:

2 cups flour

1/2 cup sugar

1/2 teaspoon nutmeg

1/2 teaspoon cinnamon

1/4 teaspoon cloves

1 teaspoon baking soda

In a separate bowl, mix together the following:

1 cup shredded zucchini

2 eggs

1/2 cup non-GMO canola oil

1 cup pureed pumpkin

splash of lemon juice

Next mix the wet ingredients into the dry.  Fold in 1/2 cup chopped walnuts.  Pour into a bread pan and bake in a 375 degree oven for 45 minutes to an hour.  Enjoy!

Coconut Truffles

IMG_1845

With Valentine’s Day right around the corner, I decided to share a guilty pleasure of mine that I concocted around the holidays and gave away as Christmas gifts.  This recipe makes a lot of truffles, so there will be plenty to give out to all of your Valentines this year.  I hope you enjoy!

Coconut Truffles

24 ounces shredded coconut

2 – 14 ounce cans sweetened condensed milk

3 cups powdered sugar

27 ounces dark chocolate chips

In a very large bowl, mix together the coconut (save about 1/4 cup to sprinkle on top later), both cans of sweetened condensed milk, and powdered sugar. Mix until combined. Roll the mixture into 1 inch diameter balls and place on a cookie sheet.  Place in the freezer for one to two hours.

Melt the chocolate on the stove using a double boiler, or in the microwave.  (I melted the chocolate in batches so as to not allow time for the chocolate to solidify while coating the coconut balls.)  Take the coconut balls out of the freezer and spoon the melted chocolate smoothly over each ball.  Then sprinkle with a bit of the reserved coconut.

Return to the freezer for about 20 minutes, or until the chocolate is firm.

Elderberry Gelatin Parfait

IMG_1800

With winter now fully upon us, my family and I have found ourselves battling some stuffy noses and sore throats.  We try to open up our mornings with a smoothie, and drink tea throughout the day, but I just began to feel that I needed to mix it up a bit and try something new in order to add an extra layer of immune support to our diet.  Enter elderberries.

Elderberries act as a wonderful boost to the immune system, while also imparting a unique currant-like flavor to a dish.  I have drunk tea infused with elderberries in the past, but again, I craved a change up of some sort.  I got just that while at co-op a few weeks ago when a dear friend shared a fabulous lunch idea she often prepared for her children:  elderberry gelatin.  I just loved her idea because not only would this snack offer the immune support of elderberries, but also the unique health benefits of quality gelatin.

Well, this week I took my friend’s idea, ran with it, and crafted an elderberry gelatin parfait.  I served it as “dessert” for dinner this week and my family gobbled it up.  (Even my eldest daughter, who has a strange fear of gelatin (“I just don’t trust something that moves around like that on your spoon,” is her famous saying. :), gave the dish a whirl.  I hope you and your family enjoy!

Elderberry Gelatin Parfait

Bring 2 cups of water to a boil.  Once the water reaches a boil, turn off the heat, add 1/4 cup dried elderberries to the water, cover the pot and allow to steep for 15-25 (depending on how strong you would like the elderberry flavor).

While the berries are steeping, mix 4 tablespoons gelatin in 1 cup of cold water.

After the berries have steeped, strain out the berries using a fine mesh strainer.  Then add 1/3 cup honey to the elderberry-infused water.

Slowly add the hot water-elderberry-honey mixture to the cold water-gelatin mixture, whisking continuously while doing so.  Pour into a shallow dish and place in the refrigerator until set.

When it is time to serve, pour 1 cup heavy whipping cream in a bowl and beat until soft peaks form.  Then cut the gelatin into small squares and alternate layers of gelatin and whipped cream in a small dish.  Enjoy!

IMG_1798

*A note about all my recipes: I use all organic ingredients, local when available. I use non-homogenized milk, and all of the dairy we use is from animals raised on pasture. I also use oils that are non-GMO verified. All our meat is raised locally on organic feed, and our beef is grass-fed, grass-finished. All our spices and cane sugar are fair-trade certified and purchased through a cooperative.

“Let Food Be Thy Medicine” Smoothie

IMG_1780

Behind us now are those holiday parties and all the delicious goodies that pair so nicely with them, and my family is attempting to get back on track and return to nourishing our bodies as we know they should be.

Most days I make this smoothie for my girls and I, and it dawned on me this morning that I have never shared this recipe with all of you.  It is a smoothie recipe I have tweaked over the past couple years as my knowledge of using food as medicine broadened.  After a great deal of trail and error, we have found this smoothie meets our needs, while also leaving us with a smile on our face as we begin each day.  It is packed with so much goodness, yet tastes great and has a consistency very similar to a milk shake (but with no dairy or sugar!).

This smoothie recipe is vegan and gluten free, and makes about 6 cups.  I hope you enjoy!

“Let Food Be Thy Medicine” Smoothie

1 can coconut milk

1/2 cup pineapple juice

1/4 lime juice

1 avocado

1 apple

1 cup fresh kale (firmly packed)

1 handful watercress

1 handful cilantro

1 strip dried Kombu (or seaweed of choice)

2 cups frozen berry mix (strawberries, blue berries, raspberries, black raspberries, blackberries)

2 tablespoons hemp seed hearts

1 teaspoon stevia

1 tablespoon bentonite clay (0ptional…Bentonite clay supplies a wealth of dietary nutrients, as well as acting as an expeller of toxins from the body.)

Place all ingredients in a blender and run until it reaches your desired consistency.  (I have a Vitamix and it mixes up quite nicely.  However, I have used a run-of-the-mill blender to make this smoothie and it works well too.)

Vegan Soap Recipe

IMG_1143

Friends, I am so very excited to share with you my vegan soap recipe today!  It is a recipe I have been experimenting with for several months now, and at this point I am very happy with the way the soap is turning out.  I also worked with Brazilian clay this go round, and I am thrilled with those results as well.

This soap recipe has been a gradual evolutionary project for me.  When I began making soap many years ago, I used a melt-and-pour base to which I added essential oils, herbs, and other fun things.  I then moved on to making my own cold-pressed soap using a combination of lard and coconut oil.  My struggle with making this type of soap was that at times when I did not have access to lard from a pig in which I knew the farmers that raised it, I was using lard purchased from the grocery store.  I had a hard time with this because I am so careful to consume (and feed my family) foods in which I feel confident in its raising/growing, and here I was, making soap that would go be lathered onto the largest organ of our bodies (our skin!) and I didn’t know where it came from.  I started to seek an alternative for our family during those months when we did not have access to local lard, and this is the result of those efforts.  I hope you enjoy!

Vegan Soap Recipe

5 cups distilled water

12 oz lye

12 cups organic unrefined coconut oil

Essential oils of your choosing (if desired)

Brazilian clay of your choosing (if desired)

*Before you get started, please know that making soap with lye can be very dangerous.  You MUST be sure you are wearing proper gloves and eyewear at all times, and you must be in a well ventilated room!  (I never, ever make soap when my children are awake.  It is not worth the risk of having them underfoot in any way.  I normally make soap very late at night after my household is asleep.  I open all of the windows in the kitchen, turn on all of our ceiling fans, and then begin.) 

Step 1:  In a large stainless steel bowl, carefully stir the lye into the distilled water.  Stir continuously until all the lye is dissolved.  (This mixture can rise in temperature to almost 200 degrees, so again, proceed with caution.)  Allow the lye-water mixture to cool to 75 degrees.  This can often take several hours.

Step 2:  Warm the coconut oil in a stock pot until it becomes liquid.  Remove from the heat and allow to cool to 80-85 degrees.

Step 3:  In a very slow and steady stream, carefully add the coconut oil to the lye-water mixture while stirring constantly.  (I often have my husband help with this process.  I slowly stir the lye-water mixture while my husband ladles in the coconut oil.)

Step 4:  Once all the coconut oil has been added, I use an immersion blender to get the soap to reach trace phase (the consistency of a thick honey).

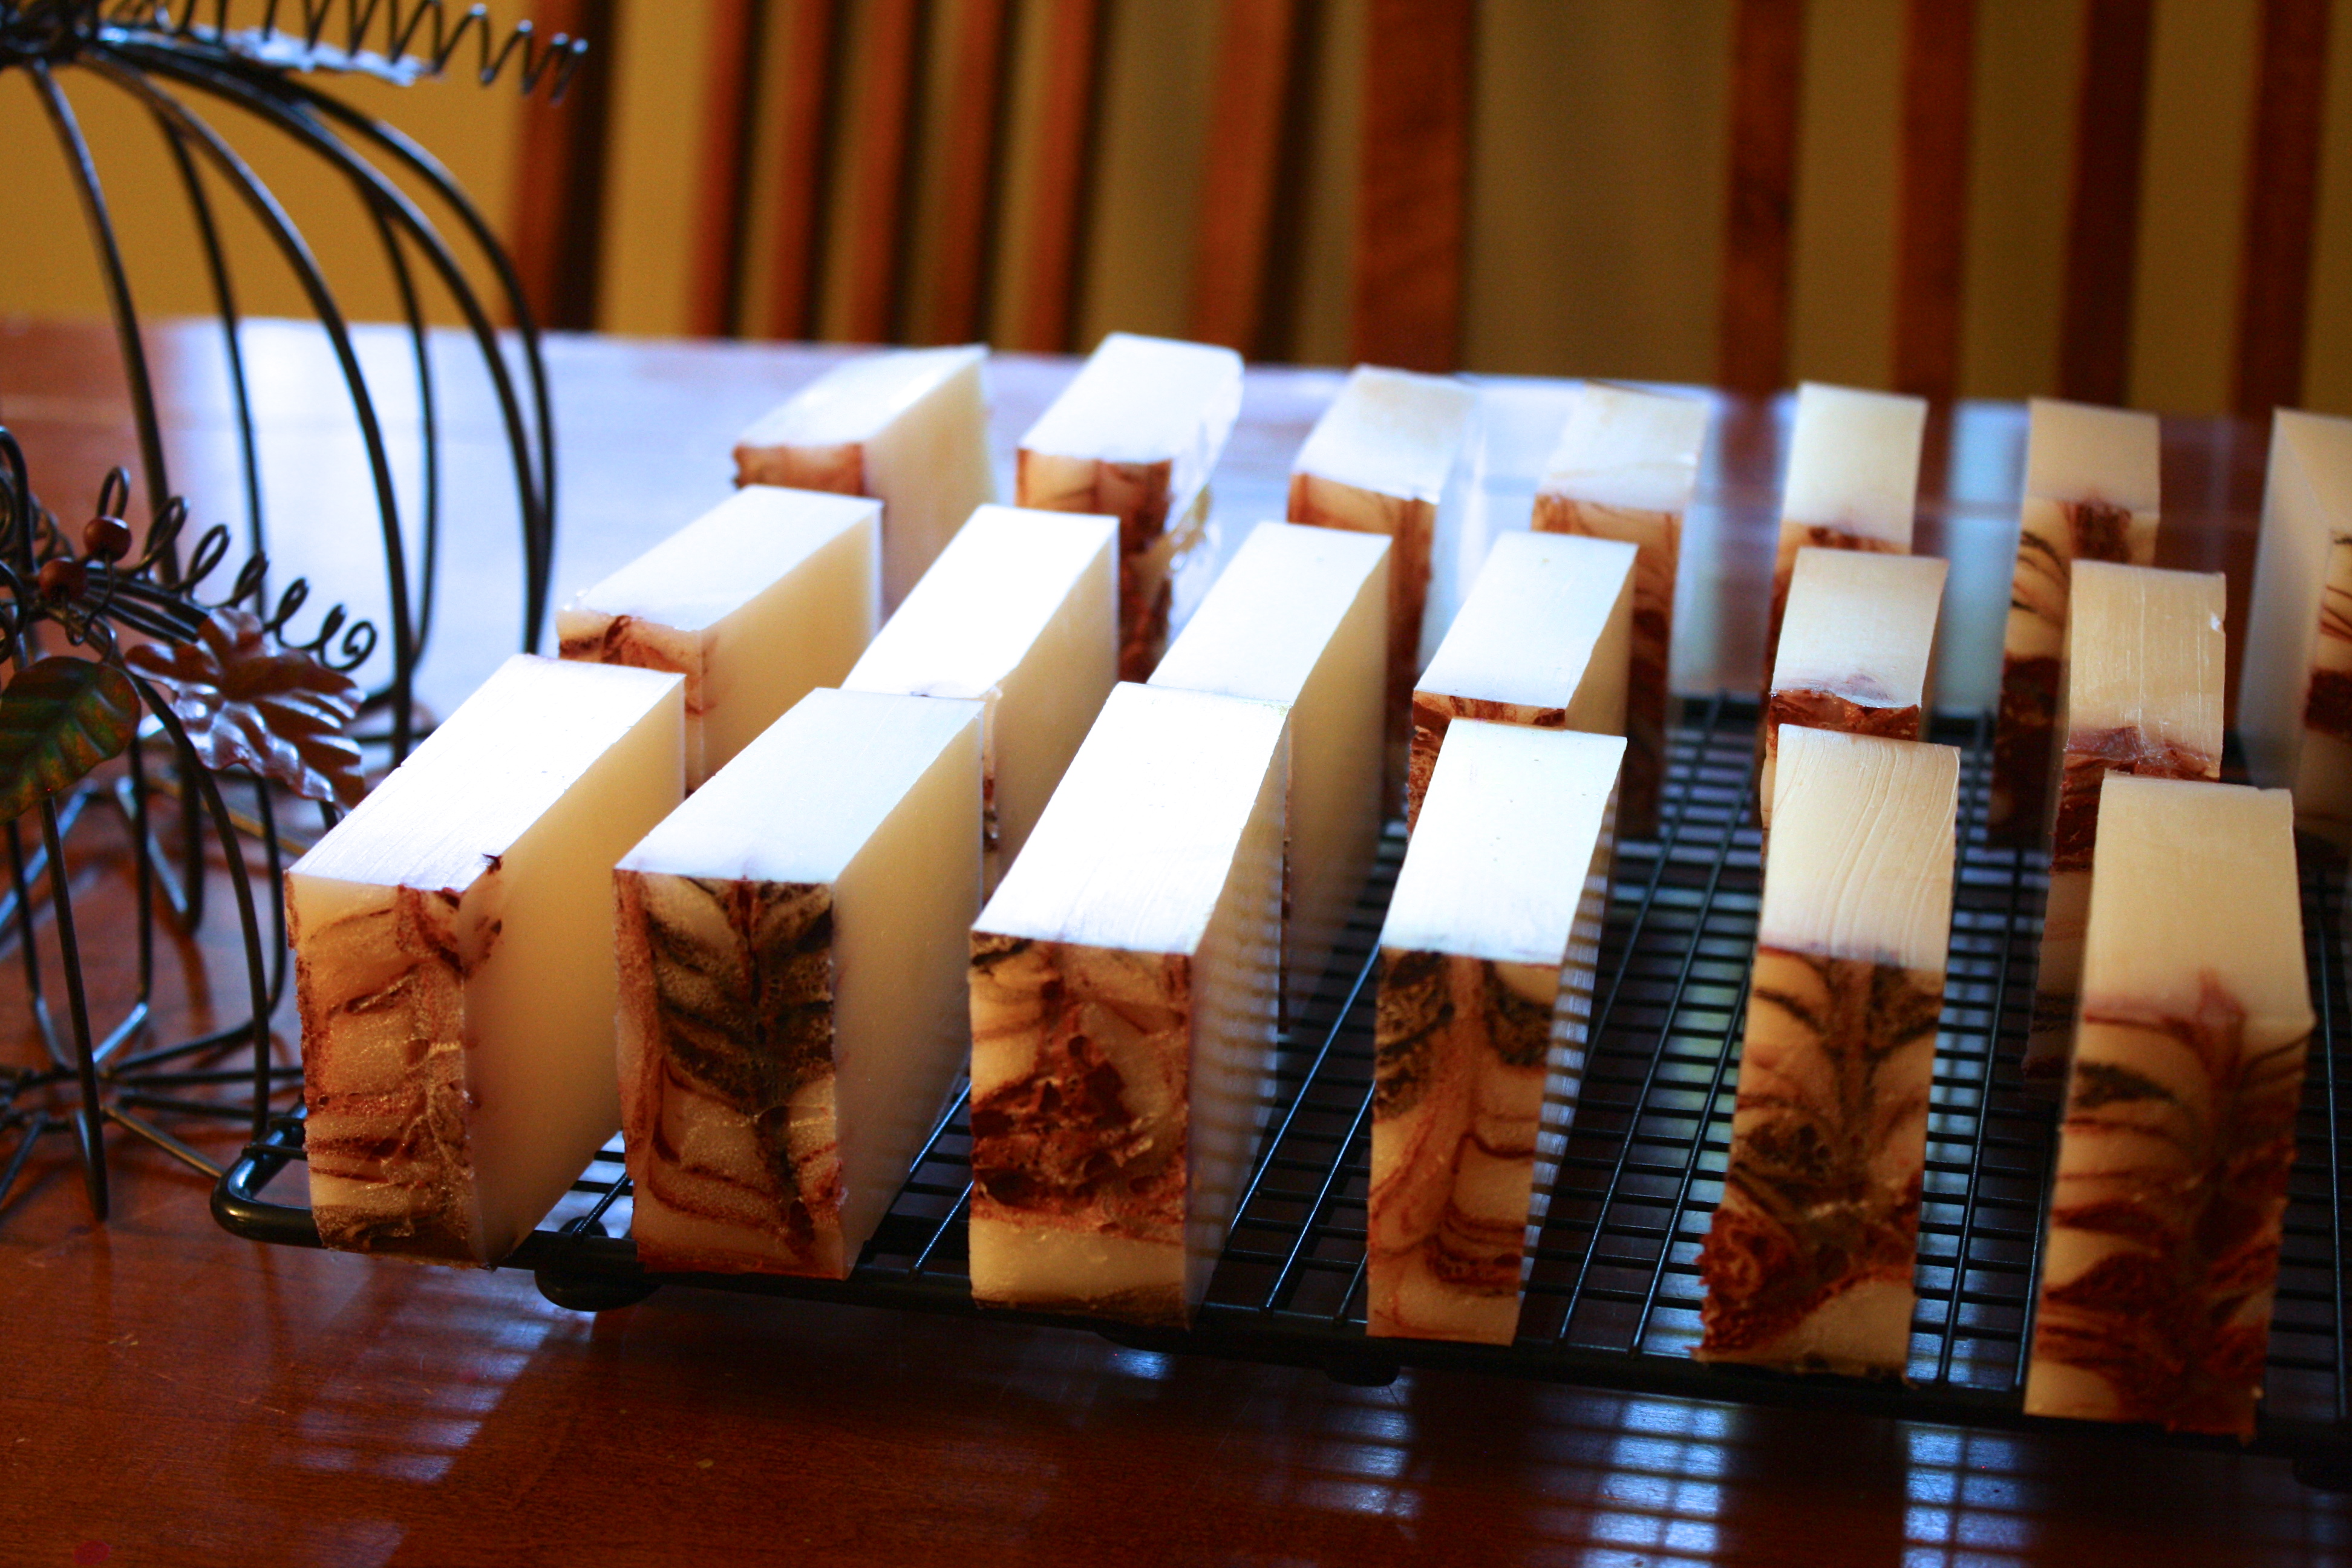
Optional Step:  If adding essential oils, blend the oils in at this time.  And if adding clay for coloring your soap:  mix a tablespoon of clay with .25-.50 mL of your chosen essential oil.  Partially mix the clay into the soap mixture so it streaks.

Step 5:  Pour mixture into soap molds.  Cover with plastic.  I then place lots of old beach towels on top of the plastic wrap to help insulate the soap.

Step 6:  Allow your soap to remain insulted for 3-4 days.  Then remove the soap from the molds, cut the soap (if necessary), and place on a cooling rack.

Step 7:  Allow your soap to cure on the cooling rack for at least 2 months before using.

IMG_1138

Dietmeier Apple Pie

Every time we gathered at my grandparent’s house in southwestern Wisconsin, homemade apple pie could be found at the center of the dessert table.  (Yes, there was always a dessert table.  It was amazing.)   My grandma and grandpa took turns making this family favorite, but it always tasted the same:  deliciously tart, yet creamy, with a hint of cinnamon underneath a crunchy sugar-layer.  To me, this pie is the quintessential fall dessert, and now that we have made the first one of the season, it seems that fall is truly being ushered in.

(The pie recipe is the same as my peach pie recipe that I shared here, and I hope you enjoy this recipe as much as you did the last.)

IMG_0953 IMG_0956 IMG_0963

Dietmeier Apple Pie

I make my own crust (recipe found here).  Place the crust in a pie plate (I love using this Stoneware pie plate because it does not burn the crust, and it looks great table side.)  Then I fill the crust with tart sliced apples.

Add about 10 tiny dollops of butter on top of the apples.  Then create a mixture of 1 cup sugar, 4 tablespoons flour and 1 teaspoon cinnamon.  Scoop this mixture over the apples and butter so the entire pie is coated.  Then add just a touch (about 1/4 cup) of water to the pie.  (Just sprinkle it over the top of the sugar mixture.  This creates a delicious custard-like consistency when it bakes.  Bake at 400 degrees for 15 minutes and then reduce the heat to 325 degrees and bake for an additional for 45 minutes.  Allow to rest at least 30 minutes before serving.

Enjoy!

*A note about all my recipes: I use all organic ingredients, local when available. I use non-homogenized milk, and all of the dairy we use is from animals raised on pasture. I also use oils that are non-GMO verified. All our meat is raised locally on organic feed, and our beef is grass-fed, grass-finished. All our spices and cane sugar are fair-trade certified and purchased through a cooperative.

Zucchini Bread with No Refined Sugar

I have been playing around with local honey yet again (as I did in this post), and I am happy to say I have worked out a delicious, ambrosial zucchini bread made with no refined sugar.  A while back I shared with you that I discovered my grandpa’s old recipe box and, tucked beneath oh so many recipe cards, I found one card explaining how to replace refined sugar with honey in baking recipes.  Ever since this card’s discovery, I enjoy playing around with recipes to try to make them free of any type of refined sugars.  Sometimes the recipes work great, other times, not so much.  But I am happy to share with you today a recipe in which the sugar-replacement worked, and I think it’s pretty darn tasty!  I hope you enjoy.

IMG_0866 IMG_0867 IMG_0869

Zucchini Bread with No Refined Sugar

In a medium bowl, mix together:

1 3/4 cups flour

1/2 teaspoon nutmeg

1 teaspoon baking soda

1/2 teaspoon cinnamon

Set this dry mixture aside.  Then in a large bowl, whisk together:

1 1/4 cups honey (I love using this great measuring cup when baking with honey because it allows me to use honey, but not have the sticky mess that normally results when doing so.)

1/2 cup canola oil

2 eggs

1 teaspoon lemon juice

1 to 1 1/2 cup(s) grated zucchini

Next, mix the dry mixture into the wet mixture.  Pour into a greased loaf pan.  (For baked goods like breads and muffins I love using the Pampered Chef Stoneware because the yummies not only bake up great, but it allows for toxin-free baking and the pieces are made in America.  For this recipe, I use this Stoneware Loaf Pan.)  Bake in a 325 degree oven for about one hour, or until a toothpick inserted into the center of the loaf comes out clean.

*Honey tends to burn faster than refined sugar.  For this reason, your bread may brown on the top before the inside is fully cooked.  If you notice this happening, simply cover the top of the bread with foil and then continue to bake.  This will help to prevent further browning on the bread’s top.

Enjoy!

*A note about all my recipes: I use all organic ingredients, local when available. I use non-homogenized milk, and all of the dairy we use is from animals raised on pasture. I also use oils that are non-GMO verified. All our meat is raised locally on organic feed, and our beef is grass-fed, grass-finished. All our spices and cane sugar are fair-trade certified and purchased through a cooperative.

Mom’s Summer Cucumber Salad

IMG_0862

From the time my mom was given her diagnoses, her constant mantra was, “Please make sure you continue to tell our stories.” It was so very important to her that the stories of our family remain alive in our hearts and continue to be told and retold, even after she was no longer with us. During one of my vigils by my mom’s bedside, I assured her that I would indeed continue to tell her stories.   I assured her I would not only share them with my girls, but with anyone and everyone who would listen. Because it is in our sharing of stories that I believe we truly get to know one another, and strengthen the bond that brings us all together in this great big world of ours. And to be honest with you, so many of my memories and stories seem to revolve around the sharing of food while sitting at a table with those we hold dear to us. I have loved sharing my family’s food stories in the past in this blog space, and it is my absolute pleasure to continue. Today I am thrilled to share with you the story of my mom’s summer cucumber salad.

While growing up, when the days seemed to stretch on forever, my sister and I felt compelled to stay outside all day long, riding bikes all over our neighborhood. It wasn’t until the sky began to turn rosey in the west that we would finally venture home, red-faced and exhausted. We would walk into the house, greeted by a cool blast from the air-conditioner, and find my mom setting the table in the kitchen. On these types of hot nights, instead of heating up the kitchen with lots of pots and pans on the stove and in the oven, my mom would always have a series of cool, fresh dishes waiting for us. My very favorite of these dishes was my mom’s cucumber salad. It was always so cool and creamy, yet tangy and fresh. It just tastes like summer.

Mom’s Summer Cucumber Salad

4-6 medium cucumbers

1 white onion

1 cup sour cream

¼ cup apple cider vinegar

1 teaspoon dill weed

salt and pepper to taste

Whisk together the sour cream, apple cider vinegar, dill weed, salt and pepper. Thinly slice the cucumbers and onions. (I use mandoline to accomplish this task because it leaves you with thin, consistently-cut produce.) Pour the sour cream/vinegar mixture over the cucumbers and onions. Mix until combined. Refrigerate until ready to serve. Enjoy!

IMG_0843 IMG_0860