Lacto-Fermented Carrots

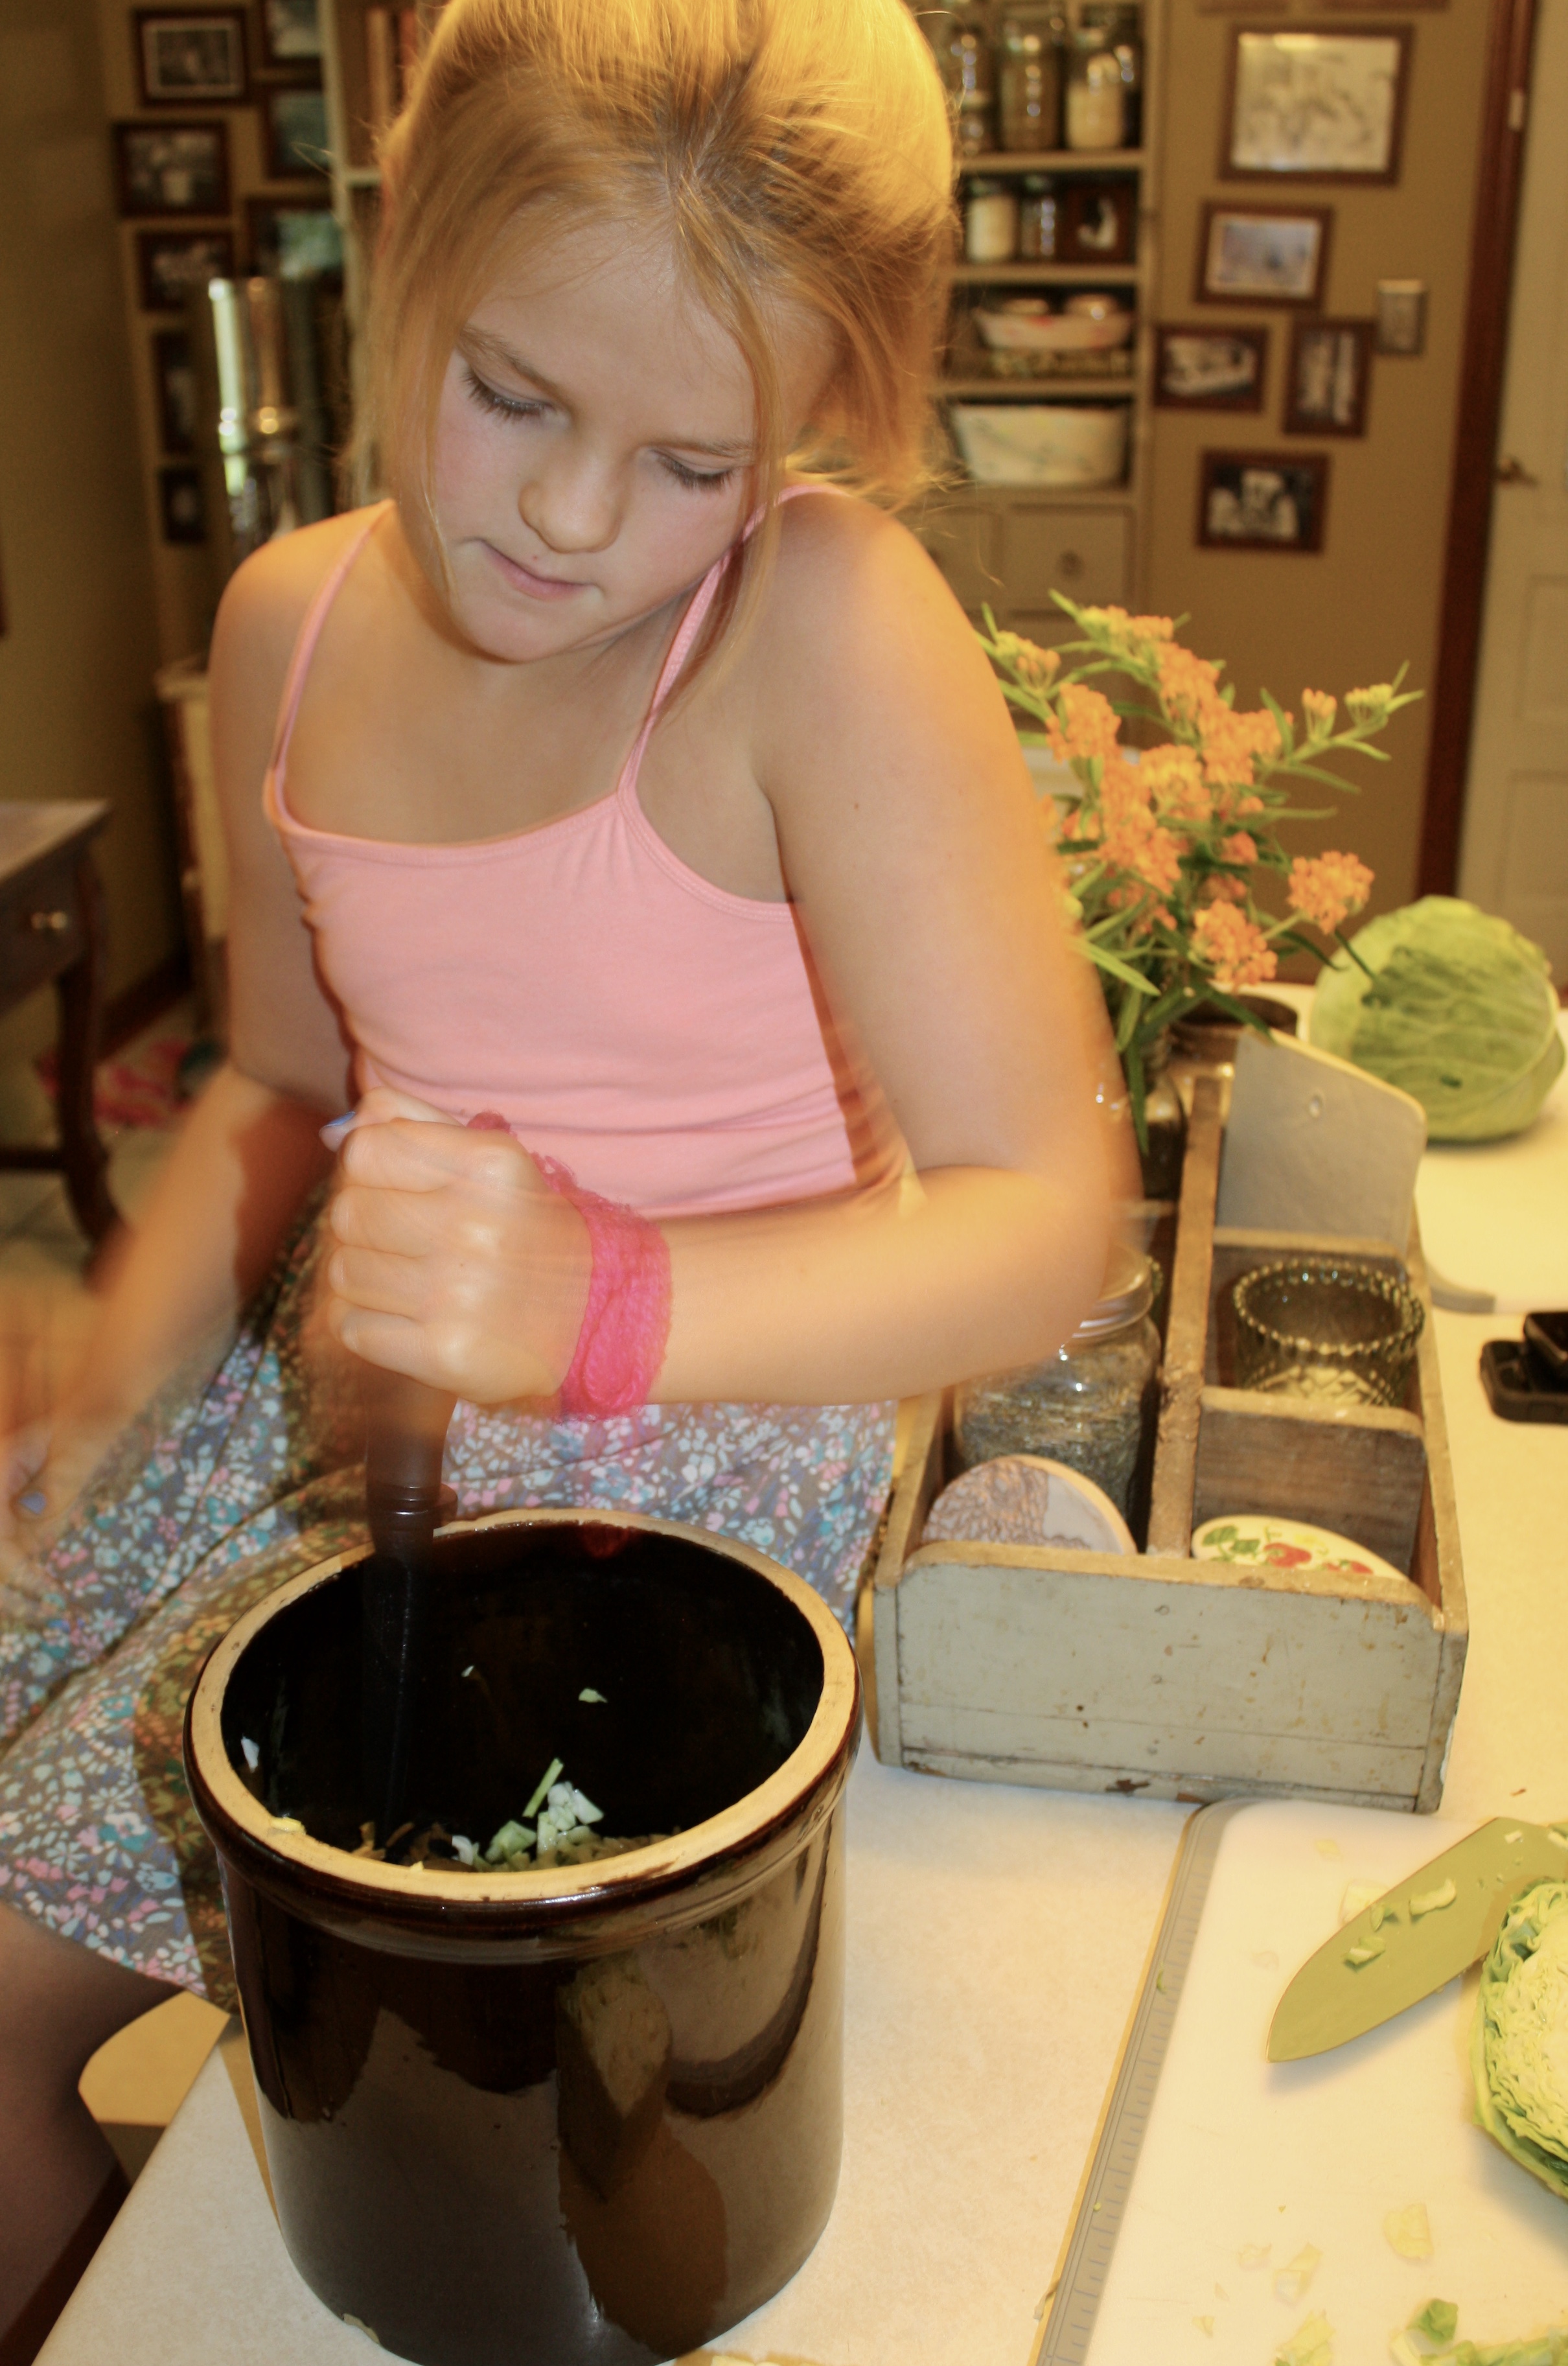
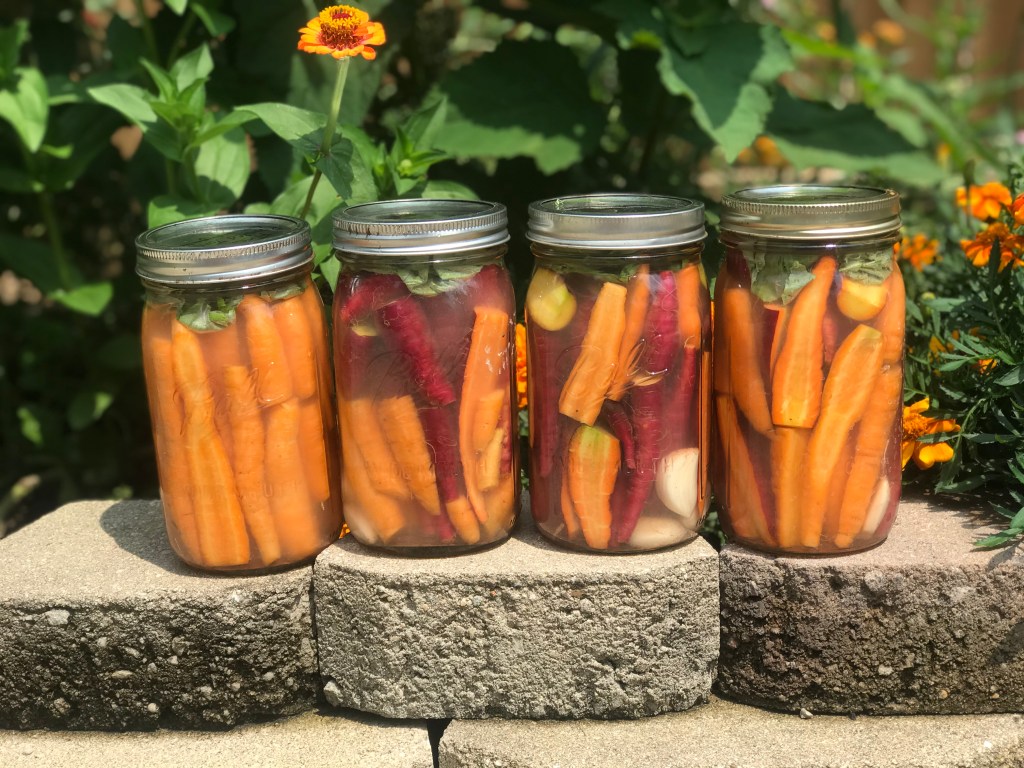
This lacto-fermented carrot recipe is a yearly go-to in our kitchen. It can be whipped up in very little time and is a family favorite with the adults and kids in the Fagan house. The carrots stay crispy, can be as tangy as you wish, all while giving your body the fermented bacterial goodness that we all need during this crazy health crisis. And the best part: It’s incredibly cheap to make!

This year I planted Dragon and Scarlet Nantes carrots in the garden and both varieties seem to work great in this particular ferment. But in all honesty, I have never had a carrot that did not work great in this recipe, so any fresh carrots will do!

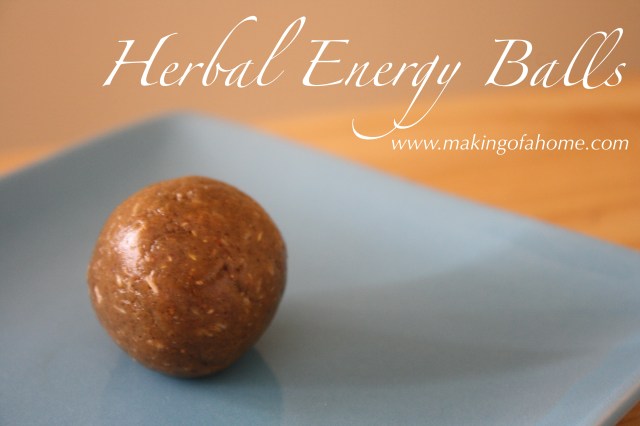
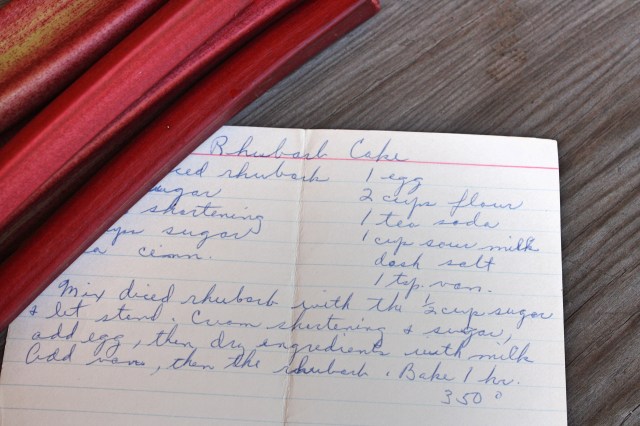
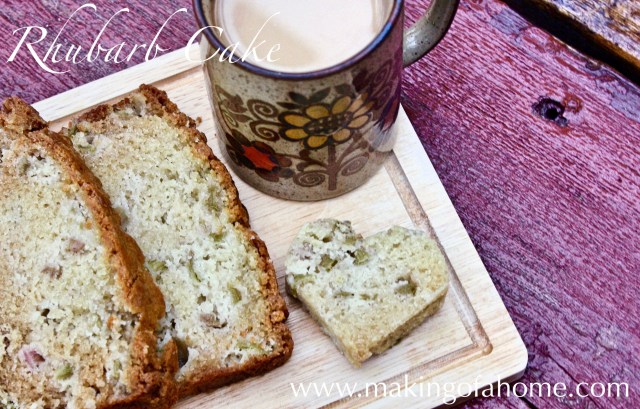
Making of a Home Lacto-Fermented Carrots

1 pound fresh carrots

4 garlic cloves

2 cups of warm water

2 tablespoons sea salt (be sure your salt contains no added fillers or anti-caking agents)

1 cabbage or collard green leaf

1 glass quart-sized canning jar

Peel your garlic cloves and place them in the bottom of your jar. Next, place your trimmed carrots vertically in the glass jar, nestling them in there nice and snug. Continue to pack your jar until you have an inch of headspace remaining.

Mix together your warm water and salt until the salt is dissolved. Then pour this mixture over the top of your carrots and garlic.

Finally, take your cabbage or collard leaf and tuck it into the jar, helping to keep all of those cute little carrot tops submerged under the brine mixture. Tightly cap your jar.

Allow your jar to sit on your counter at room temperature to ferment for 6 – 10 days, depending upon how tangy you would like your ferment to taste. ***In the beginning stages of fermentation (the first 2-3 days), you will have to “burp” your jars to allow some of the carbon dioxide to escape. If you don’t “burp” your jars, there is a chance your jars could explode.

Once your ferment reaches your desired “funk” level, place it in the refrigerator. Your fermented carrots can remain in your fridge, unopened for up to 6 months.

Vegan Soap Recipe No. 2

During this time of uncertainty, I have found myself falling back upon activities and projects that brought me happiness in the past.  One particular task that seems to always give me a sense of peace is soap-making.  There is something about the slow process, the circular motion of mixing, and the smells of oils wafting throughout the kitchen that puts my mind at ease.

What I look forward to most is that hopefully by the time this batch of soap is cured, we will be out of the quarantine and basking in the summer sunlight with our friends and family members.

This go-round I decided to try throwing a new fat into the mix…shea butter.  I love the smooth, creamy texture the shea butter gave to this soap and I cannot wait to see how it feels on the skin! I also wanted to try to bring some summer love to this batch, so I sprinkled some dried calendula pedals (from last year’s garden) onto the top of the soap before curing.

I hope you enjoy this recipe, and I look forward to sharing more at-home projects with you throughout this strange time in our world’s history.  Be safe and be well, friends.

Vegan Soap Recipe No. 2

5 cups distilled water

12 oz lye

10 cups organic unrefined coconut oil

2 cups //ws-na.amazon-adsystem.com/widgets/q?ServiceVersion=20070822&OneJS=1&Operation=GetAdHtml&MarketPlace=US&source=ac&ref=qf_sp_asin_til&ad_type=product_link&tracking_id=makofahom-20&marketplace=amazon&region=US&placement=B07S9H5BYG&asins=B07S9H5BYG&linkId=fd80223b29de721b03c43d397b4e75a5&show_border=false&link_opens_in_new_window=true&price_color=333333&title_color=0066c0&bg_color=ffffff” data-wplink-url-error=”true”>organic shea butter

Essential oils of your choosing (if desired)

Brazilian clay of your choosing (if desired) (I used yellow Brazilian clay in this particular batch.)

*Before you get started, please know that making soap with lye can be very dangerous.  You MUST be sure you are wearing proper gloves and eyewear at all times, and you must be in a well ventilated room!  

Step 1:  In a large stainless steel bowl, carefully stir the lye into the distilled water.  Stir continuously until all the lye is dissolved.  (This mixture can rise in temperature to almost 200 degrees, so again, proceed with caution.)  Allow the lye-water mixture to cool to 75 degrees.  This can often take several hours.

Step 2:  Warm the coconut oil and shea butter in a stock pot until it becomes liquid.  Remove from the heat and allow to cool to 80-85 degrees.

Step 3:  In a very slow and steady stream, carefully add the coconut oil and shea butter to the lye-water mixture while stirring constantly.

Step 4:  Once all the coconut oil and shea butter has been added, I use an immersion blender to get the soap to reach trace phase (the consistency of a thick honey).

Optional Step:  If adding essential oils, blend the oils in at this time.  And if adding clay for coloring your soap:  mix a tablespoon of clay with .25-.50 mL of your chosen essential oil.  Partially mix the clay into the soap mixture so it streaks.

Step 5:  Pour mixture into soap molds.  Cover with plastic.  I then place lots of old beach towels on top of the plastic wrap to help insulate the soap.

Step 6:  Allow your soap to remain insulted for 3-4 days.  Then remove the soap from the molds, cut the soap (if necessary), and place on a cooling rack.

Step 7:  Allow your soap to cure on the cooling rack for at least 2 months before using.

Handwritten

Handwritten recipes upon note cards.  In the world of recipe-ridden Pinterest, I fear this practice is falling (or has already been strewn) by the wayside.  But the writing itself is so very powerful, isn’t it? When I read a recipe written in the hand of a loved one, it is as if I can see the person gently scrolling the pen across the page.  Memories of that person flood my mind.

This recipe comes from my mom’s recipe box.  I was filing through it, attempting to find something very different, but when my eyes fell upon this recipe I was immediately transported to my youth.  I am running through the yard to catch up with my friends during a very lively game of capture the flag.  My mom stoops over the rhubarb patch nestled along the south side of our house.  She looks up at me and smiles.  I continue my trek, scampering barefoot through the grass as my mom clips away at the stems of the bitter rhubarb.

My mom died of a very aggressive form of cancer two and a half years ago.  One day she was active, smiling, putting her positive energy out into the universe and the next moment the cancer could literally be seen eating its way through her body.  Even now, over two years after her passing, there are days when I am going about my daily tasks and I am suddenly hit with the most aggressive type of pain.  A pain that feels as if my heart is being cut open and all that pain, hurt, and loss is spilling forth in a way that I cannot seem to mend.

The pain of this loss is real, and heavy, and raw, yet glancing at my mom’s penmanship upon this notecard grips my heart with both hands and pulls me from my emotional pit and raises me to a solid place of healing.  Seeing her scrip makes me realize that the reason I feel so much heartache over her death is because of the profound love she showed me.  For looking at this worn card immediately reminds me of the overflowing love that washed over me on that warm spring day when she raised her eyes from the intertwining ruby stems of the rhubarb plants in her garden and blessed me with her fervent smile.

Rhubarb Cake

 My mom’s rhubarb cake recipe is one I have made for years and is a family favorite of young and old alike.  I have made some minor adjustments to the original recipe (reducing the sugar content a bit and replacing the shortening with coconut oil), but the end result is still a moist, spongey cake with the perfect balance of sweet and tart.  Enjoy!

Ingredients

2 cups diced rhubarb

1 ½ cup sugar

½ coconut oil

1 teaspoon cinnamon

1 egg

2 cups all-purpose flour

1 teaspoon baking soda

1 cup buttermilk

dash of salt

1 teaspoon vanilla

Process

In a small bowl, mix the diced rhubarb with ½ cup of sugar and let stand.  In a medium-sized mixing bowl, sift together all dry ingredients, and set aside.  In a stand mixer, cream the coconut oil and remaining 1 cup of sugar.  Add the egg. Slowing add in the dry ingredients and buttermilk, alternating as you add.  Finally, add the vanilla.  Mix on medium speed for 2 minutes.  Finally, fold in the rhubarb/sugar mixture.  Pour into a loaf pan and bake for one hour to an hour and fifteen minutes at 350 degrees.

Honey Lavender Walnuts


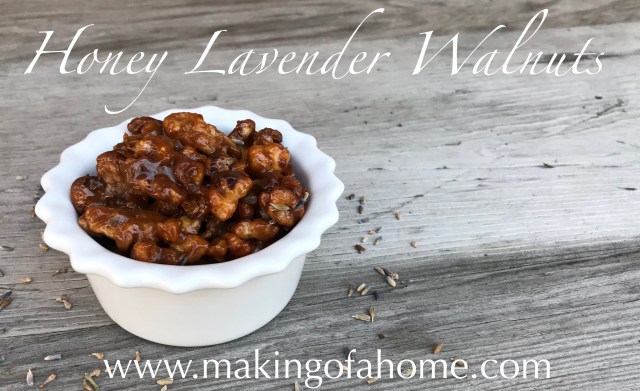
My girls and I have really been trying to adjust our eating habits throughout the school day.  Instead of snacking on crackers, pretzels and tortilla chips, we are trying to move our snacking to the non-processed variety.  This has been a bit of challenge for us lately, until we crafted this recipe early this week.  Our honey lavender walnuts give you that crunch that great snacks have, while also blessing your tongue with a bit of salt, spice and sweet goodness.  I hope you enjoy!

Honey Lavender Walnuts

2 1/2 tablespoons butter

1/4 cup local honey

1/2 teaspoon salt

dash of cayenne pepper

1/2 teaspoon cinnamon

1 teaspoon vanilla

1/2 to 1 teaspoon dried lavender blossoms

1-2 cups walnuts (depending upon how much coating you would like)

Preheat oven to 400 degrees.

Combine the butter, honey, salt, pepper and cinnamon in a small sauce pan.  Stir continuously over medium heat until melted.  Remove from heat.

Add vanilla to the butter mixture and stir well.  Next, add the walnuts and stir to coat.

Turn out onto a jelly roll pan and spread out evenly.

Bake in a 400 degree oven for 5 minutes.  Stir and spread out evenly again.  Repeat this process until your walnuts have reached a roasted degree that you enjoy.  Remove from oven.

Mix in lavender blossoms.  Allow to cool.  Enjoy!

Makin’ Kraut

IMG_4753

fullsizeoutput_b80fullsizeoutput_b7efullsizeoutput_b7d

I love cabbage in an obsessive, kind-of-creepy way.  I adore it raw in salads, sautéed in butter, and cooked down alongside a big ole’ roast in a low and slow oven.  But perhaps my favorite way to enjoy this curciferous comestible is in its fermented form as sauerkraut.

I have been starry-eyed about kraut my entire life.  In elementary school, I was the kid ordering ruebens with extra sauerkraut.  In high school, I could be found asking for sauerkraut as a pizza topping.  And when I was pregnant with my oldest daughter, sauerkraut was one of the few foods I could eat while battling morning sickness.

Beginning to make sauerkraut at home has only increased my passion for this food.  The taste and texture of home-fermented kraut is unmatched, and the nutritional value is even more unfathomable.  Loaded with literally millions of healthy bacteria, homemade sauerkraut is one of the healthiest foods you can consume.  And, one of the easiest to make.

Here’s how we do our kraut:

Step 1:  Thinly chop up a head of cabbage (green or red).

Step 2:  Spread a layer of chopped cabbage in the bottom of a glass jar or crock, sprinkle with some salt, and bash away at it with a wooden spoon.  (This will break down the membranes of the cabbage, allow the salt in, and pull water out.)

Step 3:  Continue the layering process (cabbage, salt, bash) until you have used all your cabbage and there is enough water to cover the cabbage leaves.  (You may need to add a bit of unchlorinated water.)

Step 4:  Use a plate or glass to weight down the cabbage so that every tiny piece is submerged beneath the surface of the water.  (This is very important because any cabbage leaves exposed to oxygen will grow mold.)

Step 5:  Allow to sit on your counter or in your basement.

Step 6:  Check on your kraut every couple of days until it reaches the tartness and funkiness of your liking 🙂

In Gratitude

fullsizeoutput_3cf

Awhile back, I use to post trinkets of thanks each week.  I felt that in expressing my gratitude I was able to put positive vibes out into the atmosphere, and illustrate that it is often those seemingly minuscule or insignificant items or events that end up constructing a full life.

So, after a four year hiatus, on this 13th day of April, I am so very grateful for…

~a new computer and refreshed space in which I can write.

~Apple Support and their aid when this non-techy gal tried to set up the above mentioned computer. Whew.

~my seven year old, who led me through on the of the best yoga sessions of my life.

~this new book by Ashley English, and the fabulous recipes it contains.  Many of these recipes are sure to find themselves on my kitchen table in the very new future.

~a freshly mulched garden. (And yes, that is a glass of wine on the fencepost.  One needs some mode of relief from the back pain of hauling said mulch, right?)

~several days with family this upcoming weekend—sure to be filled with farmer’s markets and swimming, farm-fresh food and tasty cocktails, laughter and tears.

Homemade Vanilla Ice Cream

img_3696

After finding my family’s old ice cream maker in my dad’s basement a few weeks back, I decided it was time to test it out again after over 25 years.  The ice cream maker still worked great, and I was so happy to be able to find an excuse to make homemade ice cream in the middle of winter 🙂

Homemade Vanilla Ice Cream

3 cups organic half and half

1 cup organic heavy whipping cream

1 cup organic sugar

8 organic egg yolks

2 teaspoons organic vanilla extract

Place the half & half and whipping cream in a large saucepan over medium heat, stirring frequently.  Mix the sugar into the egg yolks.  Once the half & half and whipping cream have reached a simmer, temper the eggs with the mixture.  Continue to stir the custard mixture over medium heat for 5-8 minutes.  Remove from heat and allow to sit for 30 minutes.  Add the vanilla extract and refrigerate until cool.  Pour into an ice cream maker and follow the manufacture’s instructions.  Enjoy!

Variations:

Chocolate Ice Cream:  Add 1 1/2 cups organic cocoa powder to the cream mixture and then simmer.

Pistachio Ice Cream:  Replace the organic vanilla extract with organic almond extract.  Then add 1 1/2 cups chopped pistachios once the mixture is cooled.

img_4554

The Apothecary

img_3672

About a year ago, my husband bought me this fabulous piece of furniture for a late birthday present.  I had been eyeing it for a couple years at a great local shop, and I knew exactly what I would use it for if ever I was lucky enough to take it home with me.  So, when it finally made its way across the threshold and in the confines of my house, I immediately went to work at crafting my vision: my very own apothecary cabinet.

Since establishing my apothecary cabinet in my kitchen, I have experimented with a slew of tonics, tinctures, and the like.  One of my most recent favorites is my “Homemade Refreshing Face Mask.”  This mask is made with bentonite clay, known for its healing and detoxifying properties.  To this clay, I add some invigorating organic non-alcohol witch hazel with aloe vera, and frankincense essential oil, which in my option is one of the best oils you can use on the regular.

So this weekend, pamper yourself with this treat 🙂

img_3686

Homemade Refreshing Face Mask

In a small bowl, combine 2 tablespoons bentonite clay, 1 drop Frankincense, and enough witch hazel to form a paste.  Mix slowly until a paste forms.  With your fingers, smooth the clay over your face, being sure to avoid your eyes.  Allow the mask to rest on your face for 5-8 minutes.  Wash off with warm water.


Herbal Energy Balls

img_3662

A few years ago, while attending the Mother Earth News Fair, I was lucky enough to attend a seminar led by herbal guru Rosemary Gladstar (I chronicaled our trip here.)  She was such a wonderful speaker:  so brilliant in her knowledge of adaptogenic herbs, but also incredibly entertaining and funny.  My favorite part of her presentation was when she was speaking of the incredible health benefits of ashwagandha root and hawthorne berry.  She said, “If you love your spouse and want to share many, many years with him/her, be sure you both consume ashwagandha and hawthorne berry daily.  If you don’t, save it all for yourself.” (!)

Ms. Gladstar discussed many different ways of consuming adaptogentic herbs, but I was particularly drawn to her idea of “energy balls.”  I played around for some time with what combination, and which ratios of those ingredients, work best for our family.  Below is the recipe we have used in my family for about a year and a half now.

These herbal energy balls are great to have as a daily snack, or if you need to grab a quick bite on your way out the door in the morning.  I hope you enjoy!

Herbal Energy Balls

32 oz. organic peanut butter

32 oz. local honey

2 cups organic unsweetened coconut

2 cups organic chocolate chips (We like to use mini chocolate chips.)

1/3 cup plus 1 tablespoon gotu kola powder

1/3 cup plus 1 tablespoon rhodiola root powder

1/3 cup plus 1 tablespoon ashwagandha root powder

1/3 cup plus 1 tablespoon hawthorne berry powder

Mix the peanut butter and honey in a large bowl.  Then add the herbs and mix to the best of your ability.  (The mixture will grow very hard to stir.  Don’t worry, this will be resolved when you add the warm coconut.)  Then toast the coconut in the oven until it is golden brown.  Add the warm coconut to the peanut butter/honey/herb mixture.  Mix thoroughly.  Add the chocolate chips and stir until combined.  Roll into one inch diameter balls and store in the refrigerator until consumption.  These will last in the refrigerator for several weeks.  Enjoy!

*Note:  I order all my herbs through Mountain Rose Herbs.

Kale Cubes

IMG_2786

Every November, we find ourselves with an overabundance of kale that gets hit with a hard frost and dies.  It always makes me feel just sick to know all of that healthy vegetation has gone to waste and ends up in the compost bin.  This year my husband came up with a great idea:  kale cubes.

When my oldest daughter was a baby, we made her baby food.  We threw a bunch of fruit and veggies in a blender with a bit of water, pureed it, and then froze it in ice cube trays.  Once the cubes froze, we popped the cubes out into a gallon-size freezer bag.  That way, at mealtime, we would just take out the cubes we wanted, heat them up, and viola…ready-to-eat baby food.  So, last week my husband came up with the brilliant idea to do this same thing with our kale!  Then that way, once winter settles in and we are longing for some healthy greens, we can pop a couple of our kale cubes into our blender to add some nutrients to our morning smoothies.

IMG_2791

All I did was harvest and wash some of our kale, threw it in our Vitamix with about one cup of water, pureed it until the mixture was nearly smooth, poured the puree into ice cube trays and popped them in the freezer.  The next day, I popped out the cubes and put them in a gallon-sized freezer bag.  Now they are all set for those February morning breakfast smoothies 🙂

IMG_2794