Rhubarb Sourdough Sweet Rolls

fullsizeoutput_23f5

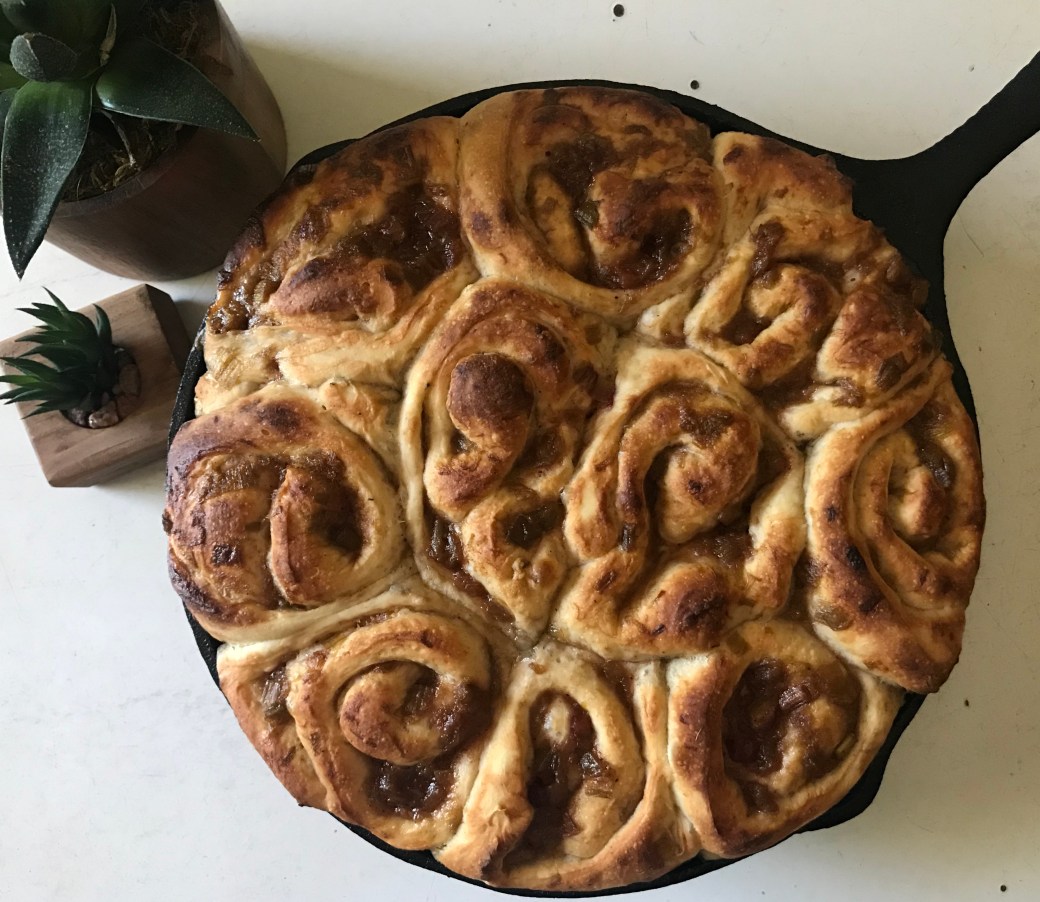
Our rhubarb crop is thriving right now, and I have been in the kitchen testing out some new recipes that showcase this first-of-the-season gem.  I recently fell down the sourdough rabbit hole and have been in love with all things sourdough, so this recipe features a bit of that fermentation love as well.  I hope you enjoy!

Rhubarb Sourdough Sweet Rolls

In a stand mixer bowl, mix the following:

  • 1 cup sourdough starter
  • 1/4 cup warm water
  • 1 cup warm milk
  • 2 cups flour

After the ingredients are thoroughly combined, cover with plastic wrap and allow to rest at room temperature for 30 minutes.

Remove the plastic wrap and add the following to the mixture:

  • 6 tablespoons melted salted butter
  • 1/2 teaspoon salt
  • 1 tablespoon vanilla

Attach the bowl to a stand mixer and mix with a dough hook for 1 minute.

Slowly add 2 additional cups of flour, while continuing to run the mixer on low speed. Once all the flour has been added, continue to mix on low speed for 3 minutes.

Turn out the dough onto a floured surface and knead lightly for about 3 minutes.  Then form a ball with the dough, place it into a greased bowl, and cover with plastic wrap.  Allow to rest at room temperature for 1 hour.

Uncover and stretch and fold the dough in a circular fashion until all of the dough has been stretched and folded.  Again, cover the bowl and allow to rest at room temperature for an hour.  Repeat this process a total of 3 times. (Your total rest time for this step will be three hours.)

During this resting period, heat the following in a medium-sized saucepan over medium heat:

  • 3 cups chopped rhubarb
  • 1 cup honey
  • 1/2 teaspoon nutmeg
  • 1/ teaspoon cinnamon

Continue to cook the mixture until the rhubarb becomes tender, then remove from the heat.  Once removed from the heat, add 1 teaspoon almond extract. Allow the mixture to fully cool.

Turn out the dough onto a floured surface and roll out into the shape of a large rectangle that is about 1/2 inch thick.

Next spread the rhubarb mixture over the entire rectangle-shaped dough.

Roll the dough, starting at one of the long ends, until you have one long roll.

Next cut the roll into 2 inch pieces.  Place the pieces snuggly into a greased cast-iron skillet or greased 9 x 9 inch baking dish. Cover the rolls with plastic wrap and refrigerate overnight.

An hour before baking, remove the rolls from the refrigerator and uncover them.  Allow to rest at room temperature for an hour.

Bake the rolls at 350 degrees for 30-40 minutes, or until the rolls become golden brown on top.

Serve and enjoy!

Vegan Soap Recipe No. 2

During this time of uncertainty, I have found myself falling back upon activities and projects that brought me happiness in the past.  One particular task that seems to always give me a sense of peace is soap-making.  There is something about the slow process, the circular motion of mixing, and the smells of oils wafting throughout the kitchen that puts my mind at ease.

What I look forward to most is that hopefully by the time this batch of soap is cured, we will be out of the quarantine and basking in the summer sunlight with our friends and family members.

This go-round I decided to try throwing a new fat into the mix…shea butter.  I love the smooth, creamy texture the shea butter gave to this soap and I cannot wait to see how it feels on the skin! I also wanted to try to bring some summer love to this batch, so I sprinkled some dried calendula pedals (from last year’s garden) onto the top of the soap before curing.

I hope you enjoy this recipe, and I look forward to sharing more at-home projects with you throughout this strange time in our world’s history.  Be safe and be well, friends.

Vegan Soap Recipe No. 2

5 cups distilled water

12 oz lye

10 cups organic unrefined coconut oil

2 cups //ws-na.amazon-adsystem.com/widgets/q?ServiceVersion=20070822&OneJS=1&Operation=GetAdHtml&MarketPlace=US&source=ac&ref=qf_sp_asin_til&ad_type=product_link&tracking_id=makofahom-20&marketplace=amazon&region=US&placement=B07S9H5BYG&asins=B07S9H5BYG&linkId=fd80223b29de721b03c43d397b4e75a5&show_border=false&link_opens_in_new_window=true&price_color=333333&title_color=0066c0&bg_color=ffffff” data-wplink-url-error=”true”>organic shea butter

Essential oils of your choosing (if desired)

Brazilian clay of your choosing (if desired) (I used yellow Brazilian clay in this particular batch.)

*Before you get started, please know that making soap with lye can be very dangerous.  You MUST be sure you are wearing proper gloves and eyewear at all times, and you must be in a well ventilated room!  

Step 1:  In a large stainless steel bowl, carefully stir the lye into the distilled water.  Stir continuously until all the lye is dissolved.  (This mixture can rise in temperature to almost 200 degrees, so again, proceed with caution.)  Allow the lye-water mixture to cool to 75 degrees.  This can often take several hours.

Step 2:  Warm the coconut oil and shea butter in a stock pot until it becomes liquid.  Remove from the heat and allow to cool to 80-85 degrees.

Step 3:  In a very slow and steady stream, carefully add the coconut oil and shea butter to the lye-water mixture while stirring constantly.

Step 4:  Once all the coconut oil and shea butter has been added, I use an immersion blender to get the soap to reach trace phase (the consistency of a thick honey).

Optional Step:  If adding essential oils, blend the oils in at this time.  And if adding clay for coloring your soap:  mix a tablespoon of clay with .25-.50 mL of your chosen essential oil.  Partially mix the clay into the soap mixture so it streaks.

Step 5:  Pour mixture into soap molds.  Cover with plastic.  I then place lots of old beach towels on top of the plastic wrap to help insulate the soap.

Step 6:  Allow your soap to remain insulted for 3-4 days.  Then remove the soap from the molds, cut the soap (if necessary), and place on a cooling rack.

Step 7:  Allow your soap to cure on the cooling rack for at least 2 months before using.

Retreat

Despite the grey, drab day, my girls and I were teeming with excitement last Wednesday as we slowly drove down Rockton Road, where the path before us turned from asphalt to crunchy limestone gravel beneath our tires.  We knew we were nearing our destination.

Coming into focus on our right was the farm that we visited many times in the past.  That wonderful place where naturally and ethically grown produce and animals thrive, and people aid in that growth with so much vibrancy and respect for Earth and what she provides for us that it is truly inspiring.

But this was not our final destination this afternoon.  Today we were venturing to a new space on the property of Angelic Organics.  Today we were lucky enough to visit the new Angelic Organics Lodge, nestled on the north side of Rockton Road on a gorgeous limestone bluff.

This space was beyond what I envisioned.  We walked through the entrance of this newly renovated space and quickly found ourselves standing on a deck overlooking an expansive oak savannah.  A muskrat scurried into the bend of Kinnikinnick Creek that lay before us, and we could hear nothing but the sound of the wind blowing through the trees, and the birds chirping happily in anticipation of warm spring weather soon to come.  The quiet of this space was so pleasantly overwhelming.  Such a change from the busy sounds of the city that we are often engulfed by on a daily basis.

Inside the walls of the lodge itself were lovely bunk rooms, a commercial kitchen, and a stunning dining hall that boasted a gorgeous stone fireplace.  And perhaps my favorite part of this building was the floors.  The flooring was made with craft paper, glue, water and then sealed with a water-based finish.  It was simply stunning!

This summer the lodge will be the home of Angelic Organics Learning Center’s Overnight Farm Camp, but the best part is, this space is not just for kids!  The lodge will host family weekends, adult farm camp, and even a weekend wellness retreat, complete with farm yoga.  Yes, please!

And if seeing the new lodge was not enough, our afternoon concluded with a chance to see baby goats, newly birthed on the farm.  And not just see them, but hold them, snuggle them and just love on them for quite some time.  It was the absolute best!

I invite all of you to check out the Angelic Organics Learning Center website for more information about all of their amazing programs.  The staff there is beyond words, and they are so helpful in answering any questions you may have about their workshops, camps, and more.  We are so blessed to have a space such as this in our area!

Lavender Rosemary Biscuits

Lavender Rosemary Biscuits

We Fagans LOVE us some biscuits! And the only thing better than a biscuit is when we can load it up with fresh garden goodness and therefore call it “healthy” 🙂  My girls and I loved how these lil’ dumplings turned out, and we hope you do as well.

Lavender Rosemary Biscuits

In a large bowl, mix together 2 cups all-purpose flour, 1 cup whole wheat flour, 1 tablespoon sugar, 4 teaspoons baking powder and 1 teaspoon cream of tartar.  Next add 3 teaspoons finely chopped fresh rosemary and 1 1/2 teaspoons fresh lavender blossoms.

Then add 3/4 cup cold salted butter (cut into small cubes) to the flour mixture using a pastry cutter or fork.

Using your fingertips, mix 1 1/4 cups buttermilk into the mixture until just combined.  Turn out onto a floured board, roll until about 3/4 inch thick, and cut into rounds using a biscuit cutter or the top of a glass.

Place the rounds on an ungreased baking sheet and bake at 450 degrees for 10 minutes (or until golden on top).

Enjoy!

*A note about all my recipes: I use all organic ingredients, local when available. I use non-homogenized milk, and all of the dairy we use is from animals raised on pasture. I also use oils that are non-GMO verified. All our meat is raised locally on organic feed, and our beef is grass-fed, grass-finished. All our spices and cane sugar are fair-trade certified and purchased through a cooperative.

Better Late Than Never Garden Update

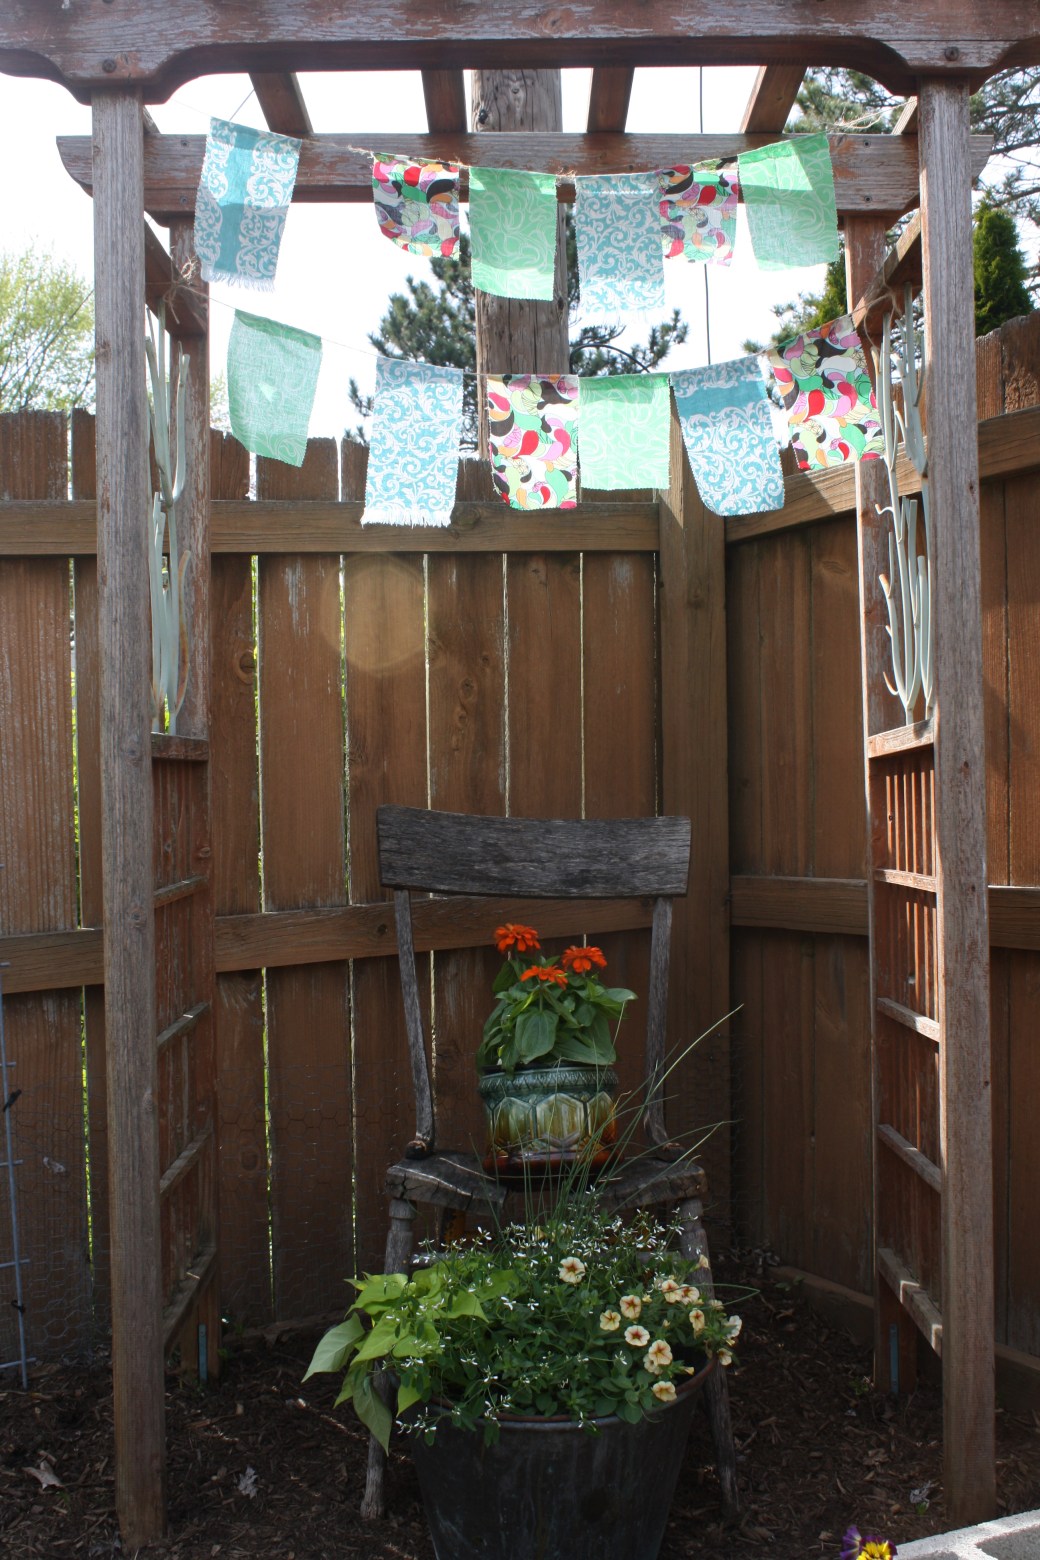
Well friends, it’s June 16th, and I am coming at you with my first garden update of the 2017 growing season.  Hum.  Where exactly did the time go?  And better yet, what on earth have I been doing?  Time has somehow slipped between my fingers so rapidly, that I cannot even seem to identify the activities that filled these minutes, hours and days.

But nonetheless, this garden of ours is surely well underway, and perhaps the furthest along we have ever been come this time of the year.  I believe I can owe a great deal of this success to the fact that my girls have been real, active participants in our homestead this year.  While in the past the girls surely had “jobs” like collecting eggs in the morning, watering their fairy garden, and picking ripe cherry tomatoes from the vine, but this year the girls have been logging some legit man-power hours.  Gianna hauls spent dishwater outside to water plants, and she moves the sprinkles around to various locations throughout these hot, dry days we have been experiencing.  Addie tilled all the garden beds this spring, and she does a great deal of the wedding that needs to be done in the veggie beds.

And let me tell you, this year these littles are much more appreciative of the strawberries gracing their breakfast table and the cilantro and lettuce making its way into their tacos come dinnertime.  And isn’t this what homesteading and forming connections with our food is all about?  With the knowledge of the human labor and natural resources needed to grow our food, we are much more humble and filled with an awe-inspiring sense of gratitude when we are able to bring that food to our tables.

I wish you all a wonderful weekend, in which you are able to nourish your body with food that gives you strength in body, as well as soul.  

Home

fullsizeoutput_54d

The last few weeks have kept us very busy with a variety of DIY projects around the house.  With the absolutely beautiful weather gracing us, my girls and I decided to take advantage, move school outside most days, and just get after it.

IMG_4667IMG_3824IMG_3825IMG_3827

We first needed to fashion a new table for our deck.  Our old table, after weathering many a Midwestern winters, had finally called it quits and we needed another piece on which all of our summer family dinners could take place.  I happened to find a local woman who was selling barn wood, so we ventured to her barn and listened to a wonderful story of a Swedish family who immigrated to the Rockford area with hopes of building a family farm.  They bought property on the corner of Baxter and Mulford Roads and there constructed a home in 1902.  Later, in 1903, they gathered with neighbors to build a barn in which to begin their farming venture.

We brought home three 10-foot boards, washed them, and ran over them once with some sandpaper.  I then applied three coats of //ws-na.amazon-adsystem.com/widgets/q?ServiceVersion=20070822&OneJS=1&Operation=GetAdHtml&MarketPlace=US&source=ac&ref=qf_sp_asin_til&ad_type=product_link&tracking_id=makofahom-20&marketplace=amazon&region=US&placement=B000C011CE&asins=B000C011CE&linkId=96a4608fd8c32411f7f8bbe7d4f64747&show_border=false&link_opens_in_new_window=false&price_color=333333&title_color=0066c0&bg_color=ffffff“>an exterior marine polyurethane to all sides of each board.  I connected the boards with 2 x 4’s in order to create a removable table top that I can bring inside during the winter months.  I then created “table legs” using cinder blocks.  I was so thrilled once the project was complete because I was able to craft a one-of-kind ten-foot table to entertain upon for under $100.

IMG_3766IMG_3811

My girls and I also got busy building a backyard washing station. While visiting Koviashuvik Living School in Temple, Maine last August, I was struck by all the ways in which the Knapp family used seemingly random household objects to craft “new” devices to serve a very sustainable purpose.  Our washing station is not completely sustainable, as we do plan to start our washing process with city water from our home, but our hope is to eliminate one avenue of waste through this process.  (And keep my kitchen cleaner too!) Each garden season we are faced with what to do with the dozens upon dozens of 5 gallon buckets filled with dirt-caked veggies that make their way into our kitchen.  Enter…our OUTDOOR veggie washing station 🙂

We had a random cement slab that was found in our yard when we bought our house and it has been milling about under a tree ever since.  So, with much assistance from my strength-and-conditioning-coach hubby, we moved the cement slab near our backyard water spigot.  I used the old legs from our outdoor table we had just scraped, and attached them to a countertop my dad had just removed from his basement during a remodel.  I then placed a washtub next to the table, with a bucket beneath the drain.  We plan to plug the washtub, dump in our muddy produce, and fill the tub with our nearby hose-water.  Once all the veggies have been scrubbed clean and placed in a strainer on the table, we can drain the tub into the bucket and then use that greywater to water our plants with.  And all of this will happen outside, and now only gloriously clean veg will make its way into my kitchen.

IMG_3813

And last, but certainly not least of our DIY adventures of late, I have created a spot in the garden entirely for me.  I moved around some aimless pieces that had been littering our property and used them as the basis for this new space.  I then crafted prayer flags and stitched each stitch with a heartfelt intention.  So here I stand to greet my morning, in my very own corner of the garden, setting positive intentions for my day.

Wishing you all a productive, yet peaceful start to your week.


Homemade Vanilla Ice Cream

img_3696

After finding my family’s old ice cream maker in my dad’s basement a few weeks back, I decided it was time to test it out again after over 25 years.  The ice cream maker still worked great, and I was so happy to be able to find an excuse to make homemade ice cream in the middle of winter 🙂

Homemade Vanilla Ice Cream

3 cups organic half and half

1 cup organic heavy whipping cream

1 cup organic sugar

8 organic egg yolks

2 teaspoons organic vanilla extract

Place the half & half and whipping cream in a large saucepan over medium heat, stirring frequently.  Mix the sugar into the egg yolks.  Once the half & half and whipping cream have reached a simmer, temper the eggs with the mixture.  Continue to stir the custard mixture over medium heat for 5-8 minutes.  Remove from heat and allow to sit for 30 minutes.  Add the vanilla extract and refrigerate until cool.  Pour into an ice cream maker and follow the manufacture’s instructions.  Enjoy!

Variations:

Chocolate Ice Cream:  Add 1 1/2 cups organic cocoa powder to the cream mixture and then simmer.

Pistachio Ice Cream:  Replace the organic vanilla extract with organic almond extract.  Then add 1 1/2 cups chopped pistachios once the mixture is cooled.

img_4554

I Stand at the Ready

fullsizerender-2

Thoughts from yesterday:

I am sitting outside of my northern Illinois home, in a tank top and shorts. Sweat trickles down my back and my hands ache from the garden work I have done. It is just 11:30 am. In February.

While working in my garden, many thoughts swirl through my mind. Why am I able to work in my garden right now? Why is the sun so warm upon my skin as I sit here on my deck, less than one week post-Valentine’s day? Why are there already green lilies breaking the surface of the soil in my garden beds? Why are their insects crawling and flying about? Am I terrified by this extreme weather streak in February?

The answer to that last question is, yes. There was record-breaking snow on the East coast this week, torrential rain in the West, and balmy weather in the northern Midwest. A definite climate shift is upon us.

Now, the way I see it, I have two choices: Option one is that I can allow myself to become paralyzed with the fear of what is to come. I can fear for the future of my children, and allow that anxiety to cripple me into inaction. Option two:  I can use the gifts God has given me and leap into action. I can strap on my garden boots and stand at the ready to teacher my own children, and others, the skills they need to grow their own food in a world of changing environmental factors. I can help them to see these changes with optimistic eyes, not ones clouded with fear. I can equip them in the ways they can help themselves in times of trouble, and also how to reach out and use their talents to help others in need.

Recently, I have found myself looking to St. Francis of Assisi for wisdom and motivation to help guide me on my journey. Today I came upon this passage, and I believe it will become motto in days to come:

Lord, help me live this day, quietly, easily. To lean upon Thy great strength, trustfully, restfully. To wait for the unfolding of Thy will, patiently, serenely. To meet others, peacefully, joyously. To face tomorrow, confidently, courageously.

fullsizerender

The Apothecary

img_3672

About a year ago, my husband bought me this fabulous piece of furniture for a late birthday present.  I had been eyeing it for a couple years at a great local shop, and I knew exactly what I would use it for if ever I was lucky enough to take it home with me.  So, when it finally made its way across the threshold and in the confines of my house, I immediately went to work at crafting my vision: my very own apothecary cabinet.

Since establishing my apothecary cabinet in my kitchen, I have experimented with a slew of tonics, tinctures, and the like.  One of my most recent favorites is my “Homemade Refreshing Face Mask.”  This mask is made with bentonite clay, known for its healing and detoxifying properties.  To this clay, I add some invigorating organic non-alcohol witch hazel with aloe vera, and frankincense essential oil, which in my option is one of the best oils you can use on the regular.

So this weekend, pamper yourself with this treat 🙂

img_3686

Homemade Refreshing Face Mask

In a small bowl, combine 2 tablespoons bentonite clay, 1 drop Frankincense, and enough witch hazel to form a paste.  Mix slowly until a paste forms.  With your fingers, smooth the clay over your face, being sure to avoid your eyes.  Allow the mask to rest on your face for 5-8 minutes.  Wash off with warm water.


From Dawn to Dusk

img_3667 img_3669 img_3673

One of my favorite times of the year arrived this week!  In the wee hours of Monday morning, we began pouring over our 2017 seed catalog (We order our seeds and transplants from The Seed Savers Exchange, based in Iowa.) and envisioning what it is we want our garden to look like this year.  Now that the girls are older, they too have taken on an added interest in this task and our day was filled with talk of which herbs would grow best inside their cinder block garden boarder, and whether or not we want to skip growing cucumbers again this summer.  (My girls no longer eat pickles.  Say what?!?)

We normally peruse the seed catalogs in February because this seems to be an especially difficult month to get through for us.  So dark.  So very cold.  This year, however, proved to be a bit strange in that this particular February day was unseasonably balmy.  So, we packed up our seed-browsing-paraphenalia and headed to the backyard.  There we started a nice fire and continued our quest for garden goodness outdoors, well into the evening.  Such an incredibly nice treat.